Learning Materials
📚 この章の学習教材
🎧 音声教材(NotebookLM)
🗺️ マインドマップ
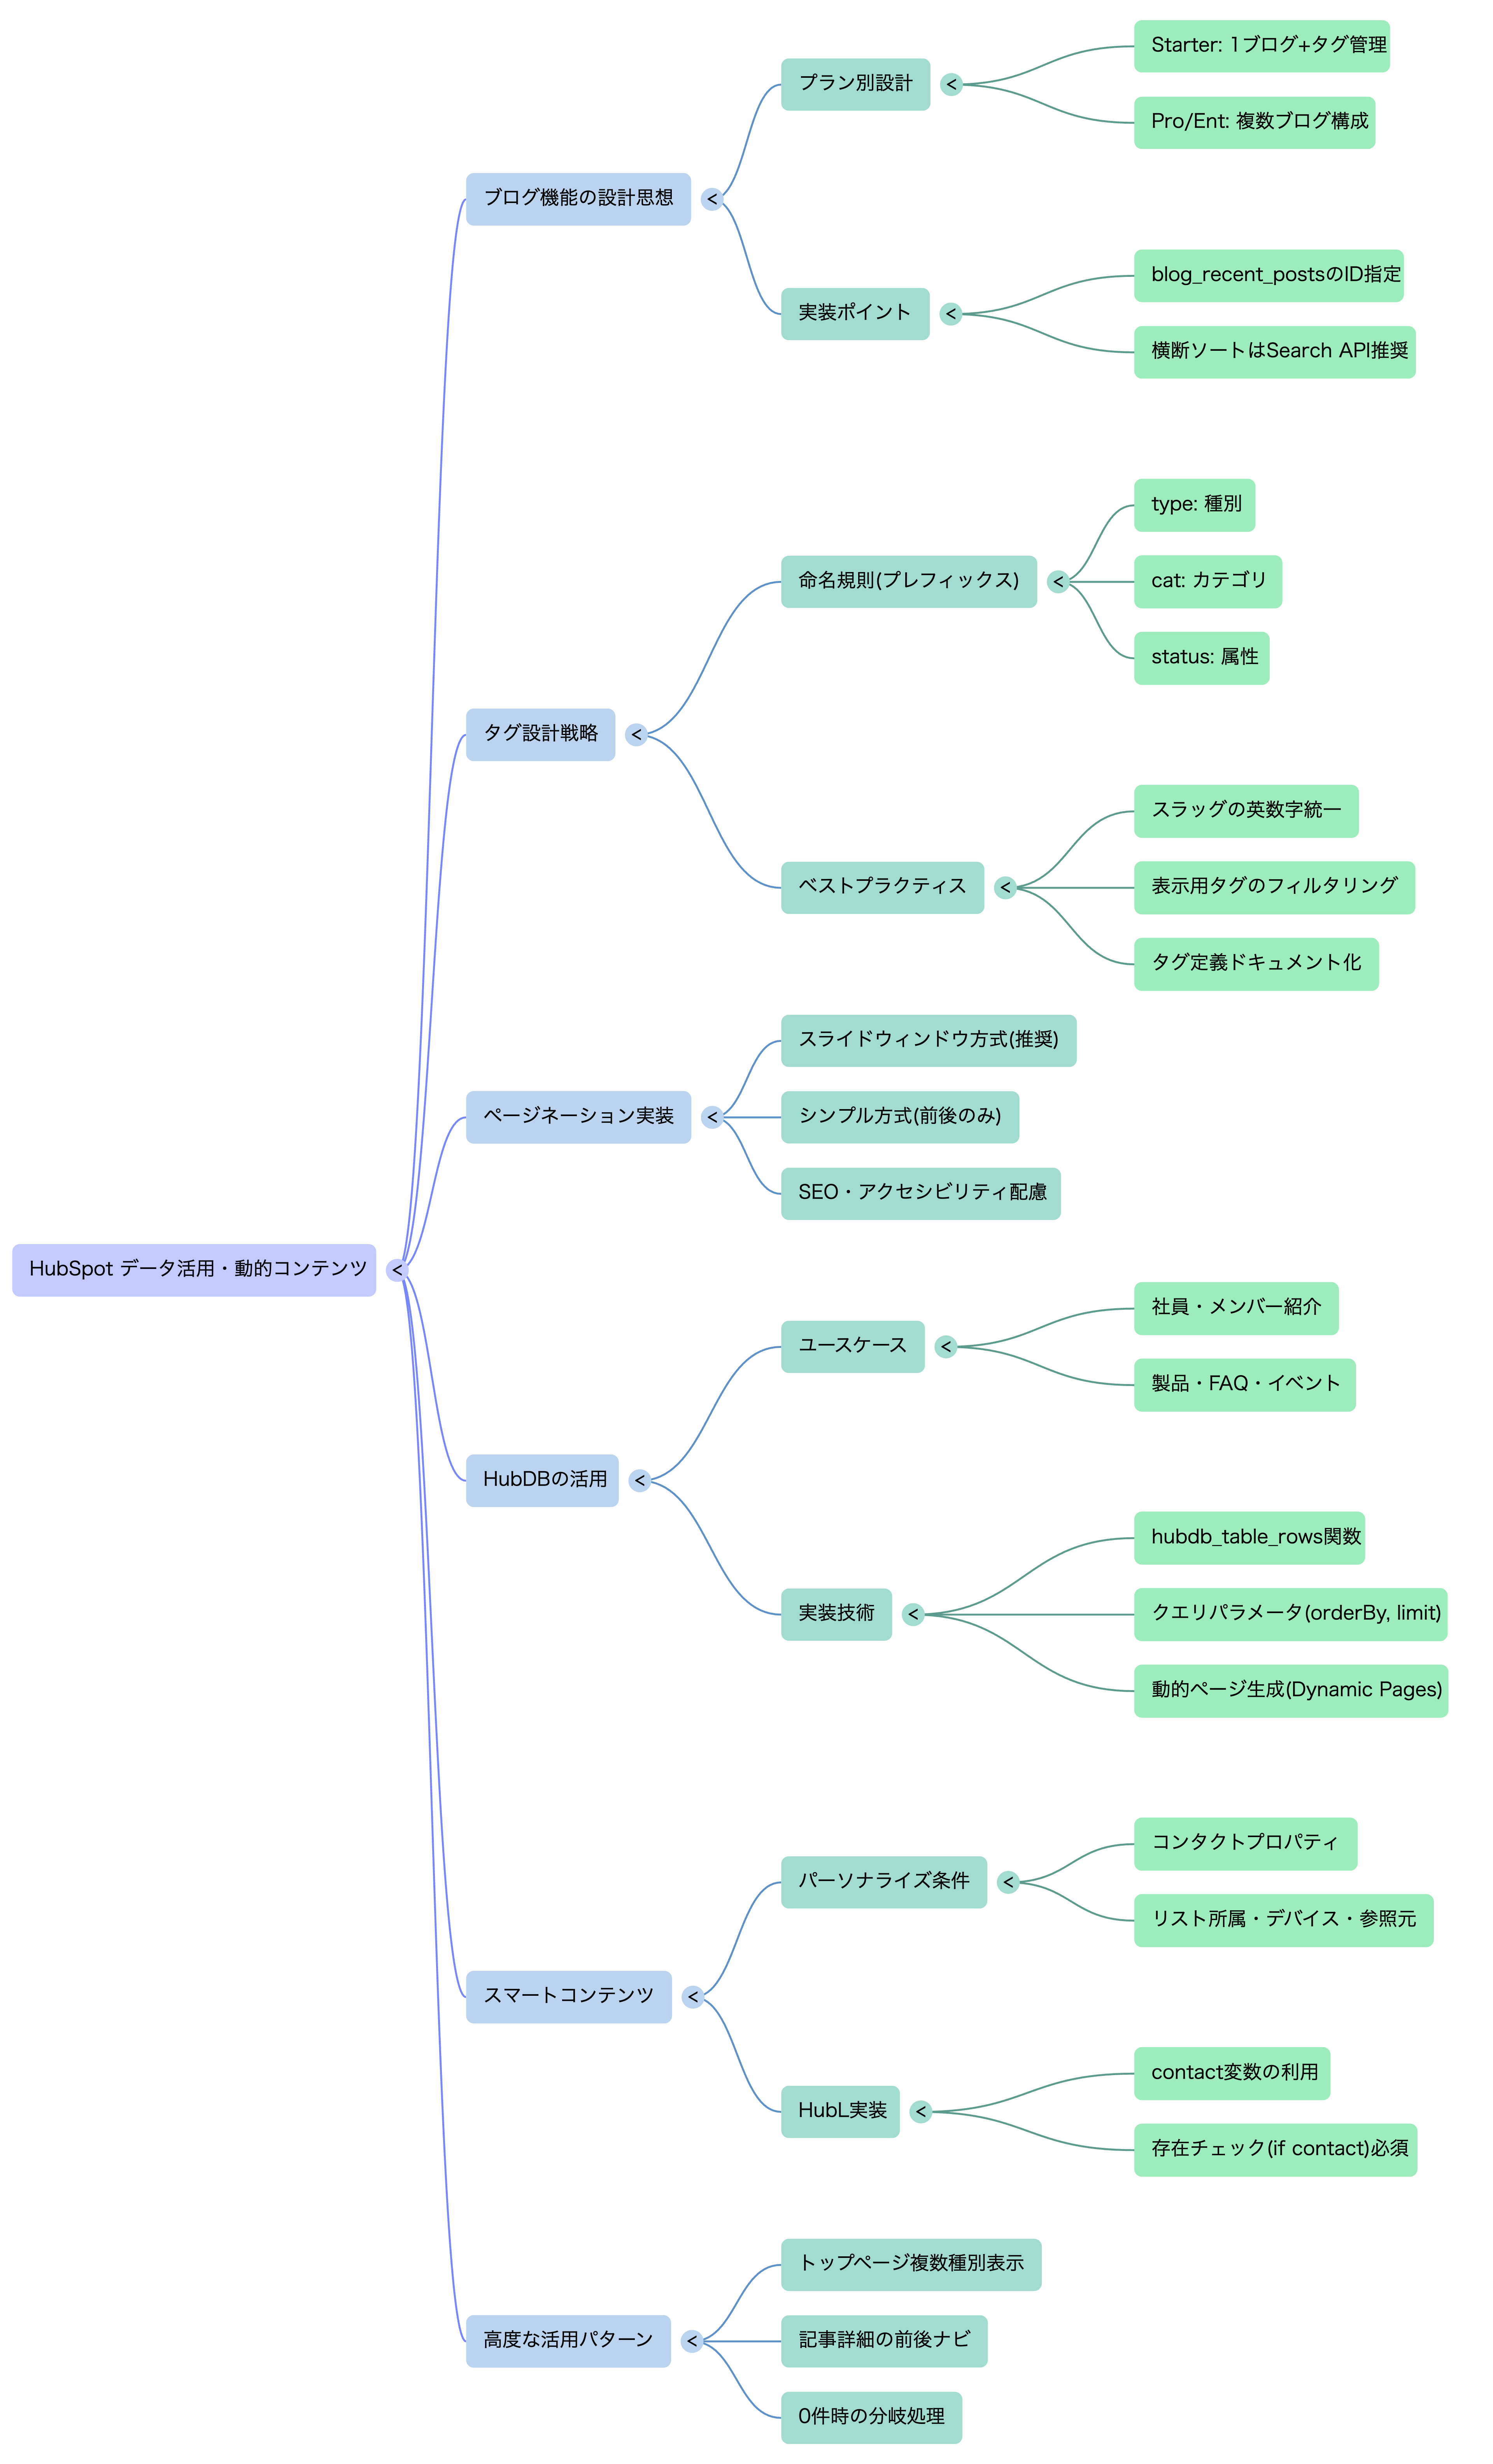
ブログ機能の深掘りとタグ設計戦略・完全ページネーション実装・HubDBによる動的データ管理・スマートコンテンツによるパーソナライズまで。HubSpotのデータ層を使いこなす章です。
HubSpot CMSのブログ設計における最初の判断は、 「1つのブログで複数コンテンツ種別を運用するか、複数ブログを使うか」です。 この選択はプランと運用体制の両方に依存します。
| プラン | ブログ数 | 推奨設計 |
|---|---|---|
| Starter | 1つのみ | 1ブログ + タグで種別管理(後述のタグ設計戦略が必須) |
| Professional / Enterprise | 最大100 | コンテンツ種別ごとに別ブログを設置する構成が理想 |
Professional以上で複数ブログを使う場合、コンテンツ種別ごとに独立したURLとテンプレートを持てます。
| ブログ名(管理画面) | URL | 用途 | テンプレート |
|---|---|---|---|
| メインブログ | /blog | ブログ記事・コラム | blog-listing / blog-post |
| セミナー | /seminar | セミナー・イベント情報 | seminar-listing / seminar-post |
| お知らせ | /news | プレスリリース・更新情報 | news-listing / news-post |
| 事例 | /case | 導入事例・カスタマーストーリー | case-listing / case-post |
複数ブログを使う場合、blog_recent_posts() の第1引数にブログIDまたはブログスラッグを指定します。
"default" はデフォルトブログのエイリアスです。
ブログIDはHubSpot管理画面の URL(app.hubspot.com/blog/PORTAL_ID/BLOG_ID/posts)で確認できます。
{# ブログIDを変数に定義して管理(保守性UP)#}
{% set blog_ids = {
  "main"    : "default",
  "seminar" : "12345678",   {# セミナーブログのID #}
  "news"    : "23456789",   {# お知らせブログのID #}
  "case"    : "34567890"    {# 事例ブログのID #}
} %}

{# 各ブログから最新記事を取得してトップページに表示 #}
{% set latest_seminars = blog_recent_posts(blog_ids.seminar, 3) %}
{% set latest_cases    = blog_recent_posts(blog_ids.case, 3) %}
{% set latest_news     = blog_recent_posts(blog_ids.news, 5) %}

{# セミナーの件数確認 #}
{% set seminar_total = blog_total_post_count(blog_ids.seminar) %}
<p>全{{ seminar_total }}件のセミナー情報</p>

{# 複数ブログの横断検索(最新記事をまとめて取得) #}
{% set all_recent = blog_recent_posts("default", 3) %}
{% set all_recent = all_recent + blog_recent_posts(blog_ids.seminar, 3) %}
{% set all_recent = all_recent + blog_recent_posts(blog_ids.news, 3) %}
複数ブログから取得した記事を公開日順でソートして表示したい場合、
HubLの sort フィルターは使えますが、publish_date がUNIXタイムスタンプのため
直接ソートするには工夫が必要です。
完全な横断検索が必要な場合はHubSpot Search API(JavaScript)での実装を検討してください。
HubSpotにはWordPressの「カテゴリ」に相当する概念がなく、 タグがカテゴリの役割も兼ねます。 特にStarterプランで1ブログしか使えない場合、 タグ設計がサイト全体の情報設計を左右する最重要要素になります。
{# ======================================================
   タグから複数のロールを同時に判定するパターン
   記事詳細(blog-post.html)の冒頭で実行
====================================================== #}

{% set ns = namespace(
  content_type  = "blog",
  categories    = [],
  is_featured   = false,
  is_pickup     = false
) %}

{% for tag in content.tag_list %}

  {# ① コンテンツ種別の判定 #}
  {% if tag.slug starts_with "type:" %}
    {% set ns.content_type = tag.slug|replace("type:", "") %}

  {# ② カテゴリの収集(配列に追加) #}
  {% elif tag.slug starts_with "cat:" %}
    {% set ns.categories = ns.categories + [tag.slug|replace("cat:", "")] %}

  {# ③ ステータスフラグの判定 #}
  {% elif tag.slug == "status:featured" %}
    {% set ns.is_featured = true %}
  {% elif tag.slug == "status:pickup" %}
    {% set ns.is_pickup = true %}
  {% endif %}

{% endfor %}

{# 判定結果を活用 #}
<article class="post post--{{ ns.content_type }}
  {% if ns.is_featured %} post--featured{% endif %}
  {% if ns.is_pickup %} post--pickup{% endif %}">

  {% if ns.is_featured %}
    <span class="badge badge--featured">注目</span>
  {% endif %}

  {% if ns.categories %}
    <div class="post-categories">
      {% for cat in ns.categories %}
        <a href="{{ blog_tag_url("default", "cat:" ~ cat) }}"
           class="category-link">{{ cat }}</a>
      {% endfor %}
    </div>
  {% endif %}

</article>
プレフィックス付きタグ(type: / cat: / status:)は
記事の表示タグ一覧に出したくない場合が多いです。
フィルタリングするパターンを用意しておきます。
{# type: / cat: / status: を除いた「表示用タグ」のみ抽出 #}
{% set display_tags = [] %}
{% for tag in content.tag_list %}
  {% if not (
    tag.slug starts_with "type:" or
    tag.slug starts_with "cat:"  or
    tag.slug starts_with "status:"
  ) %}
    {% set display_tags = display_tags + [tag] %}
  {% endif %}
{% endfor %}

{# 表示用タグのみ出力 #}
{% if display_tags %}
  <div class="post-tags">
    {% for tag in display_tags %}
      <a href="{{ tag.tag_url }}" class="post-tag"># {{ tag.name }}</a>
    {% endfor %}
  </div>
{% endif %}
① プレフィックスで役割を明示: type: / cat: / status: など用途別にルールを作る
② スラッグは英数字・ハイフンのみ: URLに含まれるため日本語は避ける
③ 1記事に1つのtype:タグ: 複数のtype:タグを付けると判定が複雑になる
④ タグ一覧ドキュメントを作る: 運用者が迷わないよう命名規則をドキュメント化する
HubSpotのブログ一覧・タグアーカイブページには、
current_page_num / last_page_num / blog_page_link()
という変数・関数が自動的に使えます。
これを使ってSEO・UX両面で最適なページネーションを実装します。
現在ページを中心に前後N件のページ番号を表示し、両端に省略(…)を入れる方式。大量ページがある場合に最適。
{% if last_page_num > 1 %}

{# ウィンドウサイズ:現在ページの前後何件を表示するか #}
{% set win = 2 %}

<nav class="pagination" aria-label="ページネーション">
  <ul class="pagination__list">

    {# ← 前へ ボタン #}
    <li class="pagination__item pagination__item--prev
      {% if current_page_num == 1 %} is-disabled{% endif %}">
      {% if current_page_num > 1 %}
        <a href="{{ blog_page_link(current_page_num - 1) }}"
           aria-label="前のページへ">←</a>
      {% else %}
        <span aria-hidden="true">←</span>
      {% endif %}
    </li>

    {# 先頭ページ + 省略記号(現在が先頭から離れている場合) #}
    {% if current_page_num > win + 2 %}
      <li class="pagination__item">
        <a href="{{ blog_page_link(1) }}">1</a>
      </li>
      {% if current_page_num > win + 3 %}
        <li class="pagination__item pagination__item--ellipsis"
            aria-hidden="true"><span>…</span></li>
      {% endif %}
    {% endif %}

    {# ウィンドウ内のページ番号 #}
    {% for i in range(1, last_page_num + 1) %}
      {% if i >= current_page_num - win and i <= current_page_num + win %}
        <li class="pagination__item
          {% if i == current_page_num %} is-current{% endif %}">
          {% if i == current_page_num %}
            <span aria-current="page">{{ i }}</span>
          {% else %}
            <a href="{{ blog_page_link(i) }}"
               aria-label="{{ i }}ページ目">{{ i }}</a>
          {% endif %}
        </li>
      {% endif %}
    {% endfor %}

    {# 省略記号 + 末尾ページ(現在が末尾から離れている場合) #}
    {% if current_page_num < last_page_num - win - 1 %}
      {% if current_page_num < last_page_num - win - 2 %}
        <li class="pagination__item pagination__item--ellipsis"
            aria-hidden="true"><span>…</span></li>
      {% endif %}
      <li class="pagination__item">
        <a href="{{ blog_page_link(last_page_num) }}">{{ last_page_num }}</a>
      </li>
    {% endif %}

    {# 次へ → ボタン #}
    <li class="pagination__item pagination__item--next
      {% if current_page_num == last_page_num %} is-disabled{% endif %}">
      {% if current_page_num < last_page_num %}
        <a href="{{ blog_page_link(current_page_num + 1) }}"
           aria-label="次のページへ">→</a>
      {% else %}
        <span aria-hidden="true">→</span>
      {% endif %}
    </li>

  </ul>

  {# 件数情報の表示 #}
  <p class="pagination__info">
    {{ current_page_num }} / {{ last_page_num }} ページ
    (全 {{ contents.total_count }} 件)
  </p>

</nav>
{% endif %}
記事数が少ない・デザインをシンプルにしたい場合に適したパターンです。
<nav class="pagination pagination--simple" aria-label="ページナビゲーション">
  {% if current_page_num > 1 %}
    <a class="pagination__prev"
       href="{{ blog_page_link(current_page_num - 1) }}">
      ← 新しい記事
    </a>
  {% endif %}

  {% if current_page_num < last_page_num %}
    <a class="pagination__next"
       href="{{ blog_page_link(current_page_num + 1) }}">
      古い記事 →
    </a>
  {% endif %}
</nav>
HubDB(ハブディービー)はHubSpot上で使えるクラウド型のリレーショナルデータベースです(Professional以上)。 スプレッドシートのような操作感でデータを管理でき、HubLからリアルタイムに取得して表示できます。
| カラム名 | スラッグ | タイプ | 説明 |
|---|---|---|---|
| Row Name(自動) | name | テキスト | 氏名(行の識別子) |
| 表示名 | display_name | テキスト | ページに表示する名前 |
| 役職 | title | テキスト | 役職・肩書き |
| 部署 | department | 選択肢 | 営業 / マーケ / 開発 / CS |
| 顔写真 | avatar | 画像 | プロフィール写真 |
| プロフィール | bio | リッチテキスト | 自己紹介文 |
| メール | テキスト | 表示用メールアドレス | |
| linkedin_url | URL | LinkedInプロフィールURL | |
| 表示順 | sort_order | 数値 | 一覧での表示順序 |
| 表示する | is_published | 真偽値 | false=非表示 |
| 関数 | 引数 | 説明 |
|---|---|---|
| hubdb_table_rows(table, query) | table: テーブルIDまたはスラッグ query: クエリパラメータ(オプション) |
テーブルの行データを配列で取得。最もよく使う関数。 |
| hubdb_table_row(table, row_id) | table / row_id: 行ID | 特定の行を1件取得する。動的ページ生成で使用。 |
| hubdb_table(table) | table | テーブルのメタ情報(列定義等)を取得する。 |
{# ====== 基本的なデータ取得 ====== #}

{# 全件取得(表示フラグ=trueのみ、表示順でソート) #}
{% set members = hubdb_table_rows(
  "team_members",
  "orderBy=sort_order&is_published=true"
) %}

{# 件数の上限指定 #}
{% set members = hubdb_table_rows(
  "team_members",
  "orderBy=sort_order&limit=6"
) %}

{# 特定の部署のみ取得 #}
{% set sales_team = hubdb_table_rows(
  "team_members",
  "department=営業&orderBy=sort_order"
) %}

{# データを一覧表示 #}
{% if members %}
  <div class="team-grid">
    {% for member in members %}
      <div class="member-card">
        {% if member.avatar %}
          <img
            src="{{ member.avatar.url }}"
            alt="{{ member.display_name }}"
            width="200" height="200"
            loading="lazy">
        {% endif %}
        <h3>{{ member.display_name }}</h3>
        <p class="title">{{ member.title }}</p>
        {% if member.bio %}
          <div class="bio">{{ member.bio }}</div>
        {% endif %}
        {% if member.linkedin_url %}
          <a href="{{ member.linkedin_url }}"
             target="_blank" rel="noopener noreferrer">
            LinkedIn
          </a>
        {% endif %}
      </div>
    {% endfor %}
  </div>
{% else %}
  <p>メンバー情報がありません。</p>
{% endif %}
| パラメータ | 使い方 | 例 |
|---|---|---|
| orderBy | ソート(カラム名、先頭に-で降順) | orderBy=-sort_order(降順) |
| limit | 取得件数上限 | limit=6 |
| offset | 取得開始位置 | offset=6(7件目から) |
| カラム名=値 | 値での絞り込み | is_published=true |
| カラム名__gt | より大きい(greater than) | price__gt=1000 |
| カラム名__lt | より小さい(less than) | price__lt=5000 |
| カラム名__contains | 文字列を含む | name__contains=東京 |
HubDB の強力な機能がDynamic Pages(動的ページ)です。
HubDBの1行が自動的に1ページになる仕組みで、
/team/tanaka-taro のような個別詳細ページを
DBのレコードから自動生成できます。
| 要素 | 説明 |
|---|---|
| ベースURL | HubSpot管理画面のページ設定で指定(例:/team) |
| 行のスラッグ | HubDBの「Row name」フィールドがURLのパスになる(例:tanaka-taro → /team/tanaka-taro) |
| テンプレート | Dynamic Pages用のテンプレートを1つ用意し、全レコードで共有する |
| データアクセス | テンプレート内で dynamic_page_hubdb_row 変数から現在の行データを取得できる |
{% extends "./layouts/base.html" %}

{# dynamic_page_hubdb_row で現在の行データを取得 #}
{% set member = dynamic_page_hubdb_row %}

{# ページタイトルをメンバー名で上書き #}
{% block meta_title %}
  <title>{{ member.display_name }} | チーム | {{ site_settings.company_name }}</title>
{% endblock %}

{% block og_tags %}
  <meta property="og:title" content="{{ member.display_name }}">
  <meta property="og:type"  content="profile">
  {% if member.avatar %}
    <meta property="og:image" content="{{ member.avatar.url }}">
  {% endif %}
{% endblock %}

{% block main_content %}
  <article class="member-detail">

    {# パンくずリスト #}
    <nav class="breadcrumb">
      <ol>
        <li><a href="/">ホーム</a></li>
        <li><a href="/team">チーム</a></li>
        <li aria-current="page">{{ member.display_name }}</li>
      </ol>
    </nav>

    <div class="member-detail__profile">
      {% if member.avatar %}
        <img
          src="{{ member.avatar.url }}"
          alt="{{ member.display_name }}"
          width="240" height="240">
      {% endif %}

      <div>
        <h1>{{ member.display_name }}</h1>
        <p class="title">{{ member.title }}</p>
        {% if member.bio %}
          <div class="bio">{{ member.bio }}</div>
        {% endif %}
        {% if member.email %}
          <a href="mailto:{{ member.email }}">{{ member.email }}</a>
        {% endif %}
      </div>
    </div>

    {# 同じ部署のメンバー一覧(関連コンテンツ)#}
    {% set same_dept = hubdb_table_rows(
      "team_members",
      "department=" ~ member.department ~ "&is_published=true&orderBy=sort_order"
    ) %}
    {% if same_dept|length > 1 %}
      <section class="same-dept">
        <h2>{{ member.department }}のメンバー</h2>
        {% for m in same_dept %}
          {% if m.hs_id != member.hs_id %}
            <a href="/team/{{ m.hs_path }}">{{ m.display_name }}</a>
          {% endif %}
        {% endfor %}
      </section>
    {% endif %}

  </article>
{% endblock %}
HubSpot管理画面の「ウェブサイト → ウェブサイトページ」から新規ページを作成し、
テンプレートに Dynamic Pages 用テンプレートを選択します。
ページの設定で「データソース」に HubDB テーブルを指定すると、
テーブルの全行分のページが自動生成されます。
dynamic_page_hubdb_row は Dynamic Pages テンプレート専用の変数です。
スマートコンテンツは、訪問者の属性(既知のコンタクト情報・デバイス・参照元・リスト所属)に応じて ページに表示するコンテンツを動的に変える機能です(Professional以上)。 HubSpotのCRM連携ならではのパーソナライズを実現できます。
既知のコンタクト(フォーム入力済み)のCRMプロパティ値に基づいてコンテンツを変える。
HubSpotのコンタクトリスト(セグメント)に入っているかどうかで表示を変える。
PC・スマートフォン・タブレット別に異なるコンテンツを表示する。
検索・SNS・メール・広告など参照元に応じてコンテンツを変える。
スマートコンテンツはHubSpotの管理画面上でモジュールをスマート化する方法と、
HubLの contact 変数で直接コンタクトデータにアクセスする方法があります。
{# ====== contact 変数:既知のコンタクト情報にアクセス ====== #}
{# 未知の訪問者の場合 contact は空(is not defined)になる #}

{# ① 既知 vs 未知の訪問者で表示を切り替える #}
{% if contact %}
  {# 既知のコンタクト:名前で挨拶 #}
  <p class="personalized-greeting">
    {{ contact.firstname }}さん、おかえりなさい!
  </p>
{% else %}
  {# 未知の訪問者:汎用のCTAを表示 #}
  <p>まずは無料で試してみませんか?</p>
{% endif %}

{# ② ライフサイクルステージで表示を切り替える #}
{% if contact.lifecyclestage == "customer" %}
  {# 既存顧客向け:アップセルCTA #}
  {% module "upsell_cta"
    path="../modules/cta-banner.module"
  %}
{% elif contact.lifecyclestage == "lead" or contact.lifecyclestage == "marketingqualifiedlead" %}
  {# リード向け:デモ申込CTA #}
  {% module "demo_cta"
    path="../modules/cta-banner.module"
  %}
{% else %}
  {# 未知 / サブスクライバー向け:資料DLフォーム #}
  {% module "download_cta"
    path="../modules/form-section.module"
  %}
{% endif %}

{# ③ 業種でコンテンツを切り替える #}
{% set industry_cases = {
  "製造業"   : "manufacturing",
  "IT"       : "it",
  "不動産"   : "realestate",
  "金融"     : "finance"
} %}

{% if contact and contact.industry and industry_cases[contact.industry] %}
  {% set case_tag = industry_cases[contact.industry] %}
  {% set related_cases = blog_posts("case", 3, 0, case_tag) %}
  {% if related_cases %}
    <section class="industry-cases">
      <h2>{{ contact.industry }}の導入事例</h2>
      {% for case in related_cases %}
        <a href="{{ case.absolute_url }}">{{ case.name }}</a>
      {% endfor %}
    </section>
  {% endif %}
{% endif %}
| プロパティ | 内容 | 値の例 |
|---|---|---|
| contact.firstname | 名(ファーストネーム) | 太郎 |
| contact.lastname | 姓(ラストネーム) | 田中 |
| contact.email | メールアドレス | taro@example.com |
| contact.company | 会社名 | 株式会社サンプル |
| contact.industry | 業種 | IT・通信 |
| contact.lifecyclestage | ライフサイクルステージ | lead / customer 等 |
| contact.jobtitle | 役職 | マーケティングマネージャー |
| contact.phone | 電話番号 | 03-xxxx-xxxx |
contact 変数が使えるのはProfessional以上のプランで、かつ
HubSpotのトラッキングクッキーが有効な既知のコンタクト(フォーム送信済み等)のみです。
未知の訪問者・Cookieをブロックしている訪問者では空になります。
必ず {% if contact %} で存在チェックをしてからアクセスしてください。
{# 各コンテンツ種別の最新記事を取得(1ブログ+タグ絞り込み)#}
{% set tab_config = [
  {"id": "all",       "label": "すべて",   "tag": ""},
  {"id": "blog",      "label": "ブログ",   "tag": "type:blog"},
  {"id": "seminar",   "label": "セミナー", "tag": "type:seminar"},
  {"id": "news",      "label": "お知らせ", "tag": "type:news"},
  {"id": "case",      "label": "導入事例", "tag": "type:case"}
] %}

{# タブナビゲーション #}
<div class="content-tabs" role="tablist">
  {% for tab in tab_config %}
    <button
      class="content-tab{% if loop.first %} is-active{% endif %}"
      role="tab"
      data-target="#tab-{{ tab.id }}"
      {% if loop.first %}aria-selected="true"{% endif %}>
      {{ tab.label }}
    </button>
  {% endfor %}
</div>

{# 各タブのコンテンツパネル #}
{% for tab in tab_config %}
  {% if tab.tag %}
    {% set tab_posts = blog_posts("default", 6, 0, tab.tag) %}
  {% else %}
    {% set tab_posts = blog_recent_posts("default", 6) %}
  {% endif %}

  <div
    id="tab-{{ tab.id }}"
    role="tabpanel"
    class="tab-panel{% if not loop.first %} is-hidden{% endif %}">
    {% if tab_posts %}
      <ul class="post-grid">
        {% for post in tab_posts %}
          <li>
            <a href="{{ post.absolute_url }}">
              {% if post.featured_image %}
                <img src="{{ post.featured_image }}"
                     alt="{{ post.featured_image_alt_text|default(post.name) }}"
                     loading="lazy">
              {% endif %}
              <p>{{ post.name }}</p>
              <time>{{ post.publish_date|datetimeformat("%Y.%m.%d") }}</time>
            </a>
          </li>
        {% endfor %}
      </ul>
    {% else %}
      <p>コンテンツがまだありません</p>
    {% endif %}
  </div>
{% endfor %}

{# タブ切り替えのJS(HubLで生成したIDを利用) #}
<script>
document.querySelectorAll('.content-tab').forEach(tab => {
  tab.addEventListener('click', () => {
    document.querySelectorAll('.content-tab, .tab-panel').forEach(el => {
      el.classList.remove('is-active');
      el.classList.add('is-hidden');
      el.removeAttribute('aria-selected');
    });
    tab.classList.add('is-active');
    tab.setAttribute('aria-selected', 'true');
    const panel = document.querySelector(tab.dataset.target);
    if (panel) {
      panel.classList.remove('is-hidden');
    }
  });
});
</script>
{# blog_post テンプレートで使える next_post_featured_image 等の変数 #}
<nav class="post-nav" aria-label="前後の記事">

  {% if next_post_featured_image or next_post_name %}
    <a class="post-nav__prev" href="{{ next_post_url }}"
       rel="prev">
      <span>← 次の記事</span>
      {% if next_post_featured_image %}
        <img src="{{ next_post_featured_image }}"
             alt="{{ next_post_name }}" loading="lazy">
      {% endif %}
      <p>{{ next_post_name }}</p>
    </a>
  {% endif %}

  {% if last_post_featured_image or last_post_name %}
    <a class="post-nav__next" href="{{ last_post_url }}"
       rel="next">
      <span>前の記事 →</span>
      {% if last_post_featured_image %}
        <img src="{{ last_post_featured_image }}"
             alt="{{ last_post_name }}" loading="lazy">
      {% endif %}
      <p>{{ last_post_name }}</p>
    </a>
  {% endif %}

</nav>
{% set total = blog_total_post_count("default") %}

{% if total == 0 %}
  {# サイト全体でまだ記事がない場合 #}
  <div class="blog-empty">
    <p>まもなく記事を公開します。しばらくお待ちください。</p>
  </div>
{% elif contents|length == 0 %}
  {# タグページなどで該当記事が0件の場合 #}
  <div class="blog-empty">
    {% if content.tag %}
      <p>「{{ content.tag.name }}」の記事はまだありません。</p>
    {% else %}
      <p>記事がまだありません。</p>
    {% endif %}
    <a href="/blog">すべての記事を見る</a>
  </div>
{% else %}
  {# 記事が存在する通常表示 #}
  <ul class="post-grid">
    {% for post in contents %}
      {# ... #}
    {% endfor %}
  </ul>
{% endif %}
Starterは1ブログ+タグ設計で種別管理。Professional以上は種別ごとに独立したブログを設置。複数ブログはIDを変数化して管理する。
type: / cat: / status: のプレフィックスで役割を分離。namespace パターンで複数属性を同時判定。表示用タグのみフィルタリングする実装が必須。
スライドウィンドウ方式がUX・SEO両面で最適。aria-current / aria-label を含めたアクセシブルな実装を心がける。件数情報の表示も忘れずに。
社員紹介・製品一覧・FAQ等の構造化データ管理に最適。hubdb_table_rows() のクエリパラメータを使い、必要なデータだけを取得する。
HubDBの1行が自動的に1ページに。dynamic_page_hubdb_row 変数で行データにアクセス。テンプレートは1つで全レコードを共有する。
contact 変数で既知コンタクトの情報にアクセス可能(Professional以上)。必ず存在チェックを入れ、ライフサイクルステージ・業種等で表示コンテンツを分岐する。